Monday 25 March 2013

Work Record March 21st 2013


Preparation;
The aim for this shoot is to show the contrast between mental and physical age. To do this I plan on using someone aged 17, and dress them to look like a baby to show how they are physically 16, but mentally they are a baby.


I like these images above as they show adults acting as babies/toddlers. I like these as they look natural and are in a realistic environment; however, I will be using a studio. I like the one on the top due to how it shows a sleepier more calm representation of a child. I like the one on the bottom as it shows the use of a teddy as a prop which could work in a number of ways and extends the image and what it can show.

To prepare I need to;
  • ·         Book the studio
  • ·         Get a model
  • ·         Plan any specific poses
  • ·         Get any props

What I hope to achieve;
From this I hope to achieve a shoot showing the realistic contrast between mental age and physical age by dressing up a 17 year old as a baby to show how although she is 17, she is mentally about 3 years old. 


What I actually achieved;
I am really happy with what I achieved during this shoot, and would go as far as saying it one of the better shoots I have done due to the outcome. For this shoot I decided to use a white background as it represents more innocent ideas which are how babies ad toddlers are seen. To keep in with the bright, fun and innocent theme, I decided to use both lights so it was well lit and bright. Although I did experiment with using just one light, but it created too much shadow which was not what I was looking for. I decided to use props including nappies, a soother, a doll and a “blankie”. I used these as props as they are general props associated with babies. I got a range of shoots showing different compositions and ranging from close ups of the head to full body images. None of these poses worked better than the others and I got a good and varied range, and achieved what I was aiming to.

 This is my favourite photo from the shoot, mainly due to the angle and composition. What I really like is how her head looks really big due to the angle and the fact that I zoomed right out on the camera, and I went right up close to the model. When editing, I chose use selective colour as I thought it would make it look dramatic, and keep it looking humorous and silly. I made the pink in the dummy a lot brighter, and made the light reflecting, shiny areas brighter as well. On the eyes I used the dodge tool and made them brighter to make the model seem more excited and more like a child. 


I also like this one quite a lot as instead of showing her as bold, it shows the model using the doll and dummy as if for comfort or protection, while still keeping the image light and happy. I spent a lot of time editing this image, and before deciding to turn it into a cluster image, I spent a lot of time working on editing the face. When editing the face I re coloured a few areas, and removed dark circles, making her face brighter and using Gaussian blur to make her seem younger. I then chose to turn this into a cluster image as I think the image works with the layout.


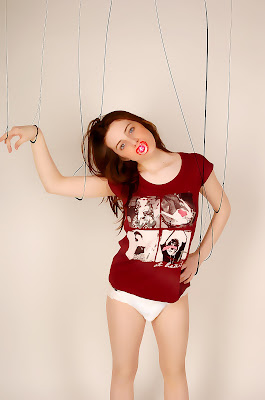
This is another image that I really like, due to the editing. I also like how the composition is looking down on the model, making her seem inferior slightly. For this, the idea of turning her into a puppet was not planned and instead, we was experimenting with different poses which are to do with babies and toddlers – which led to the  teapot pose in relation to the nursery rhyme. When editing, I at first kept it really natural, just adjusting colours and perfecting areas. But then as I did not want to crop the image, I decided to turn her into a puppet. To do this I first used surface blur as it gives a false, plastic effect. I then added lines using shape, and then warped them on transform. 


What I am going to do next;
I am really happy with how this turned out, and therefore do not feel the need to go back and re shoot it. I am now going to develop the idea I previously looked at which is life and death using the idea of zombies.


Work Record March 19th 2013


Preparation;
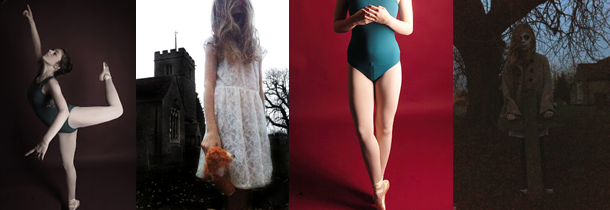
http://www.deviantart.com/download/201257535/zombie_girl_by_yanazombiechernikova-d3btnb3.jpgThe purpose of this shoot is to get images of me as a zombie and looking normal. This is to show the contrast between the dead and the living. To show the contrast effectively, I am going to create an animation.


The image on the top relates to what I plan on doing as it is natural and normal, which is what part of my shoot is going to be, as I want the contrast to be strong and obvious. The image on the bottom relates as it is showing zombie/dead makeup and the model looks lifeless. 


To prepare I need to;
  • ·         Plan makeup ideas
  • ·         Book studio
  • ·         Plan any specific poses


What I hope to achieve;
By the end of the shoot and editing, I hope to get some good photos that I can put together to create an animation showing the change from “human” to zombie.

What I actually achieved;
I am really happy with what I achieved with this shoot, as I effectively got two different shoots done in one – one normal and one with zombie FX makeup. I chose to use a dark background to make the makeup and expressions stand out more, and because black goes with both ideas I was showing in this. The poses I done were obvious dead zombie poses, natural smiley and poses and shut eyes so the transition between human to zombie would be smooth. As this was exactly what I wanted and needed to do I did not try out other ideas. I did how ever try out being close to the camera and further away which created more shadow which was better for the zombie photos. When editing, I focused primarily on creating the animation rather than the editing single images.

Animation;
For the animation, I kept the editing really simple and chose to keep the colours natural for the natural shoots, but then the images showing the zombie idea I decided to make my skin seem whiter and greyer, and make the blood more vivid. I did not need to edit my eyes as I was wearing white out contacts. When choosing the correct images, I had to choose ones that were similar sizes and composition to make the transition smooth, but when I was layering them, I did use free transform to size them to fit better. As this is my first animation, I am really happy with the result of this. 


The animation can be found on this link here; 


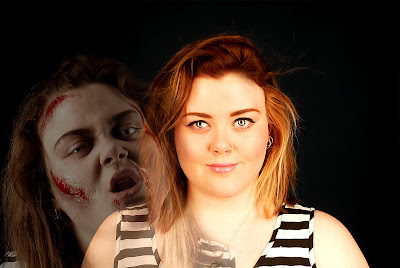
For this edit, the idea behind it was “everybody’s got a dark side”. To show this idea, I decided to use a natural image and keep it natural by just perfecting the skin and making the eyes stand out more. To show the dark side I layered one of the zombie images on top and turned the opacity down so that it was visible but not overpowering. This shows the idea I want well, as it looks like the “darker side” is fighting though or just slightly visible.


For this edit I wanted to just focus on the zombie side, and make it seem more “early Hollywood zombie movies” style. To achieve this I added noise to distort the image and make it seem more vintage. Before I added the noise, I made the reds brighter and the white on the eyes whiter. I then desaturated the colour a bit, but not so much that the red was not vivid.


What I am going to do next;
As I am really happy with the result of this animation and shoot, I am leaving this idea now. But I do plan on revisiting the idea of life and death with the zombie theme as it is one of my favourite and most fun ideas to shoot, create and edit. 


Monday 18 March 2013

Work Record March 5th 2013


Preparation;
Due to the nice weather today, I am planning on going out the forest and do a shoot. The aim of this shoot is to do a shoot showing various different areas of nature including trees, and rivers. The way this shoot is going to contribute to ‘Contrasts’ as it will show contrasts between different colours and light and shadow.

Both of these photographs give me inspiration for my shoot and show ideas that I want to show in my shoot. I like the one on the top due to the contrast between the trees and the water. I also like how the water clearly mirrors the trees. I like the one on thebottom because of the way it shows light and shadow with the shadows of the trees. I also like how it is in black and white as it intensifies the light/shadow contrast.
To prepare I need to;
·         Get a camera
·         Decided where I am going to take photos
·         Decided if I am going to focus on anything in particular.
What I hope to achieve;
From this shoot I hope to get a good range of images showing nature and natural contrasts in nature.
What I actually achieved;
I am really happy with how the shoot went, especially it was something I do not do much of as I am usually doing portraits or shooting in the studio. I managed to get a range of images varying from close ups of trees and ones showing shadow and light through trees. I am particularly happy with the photographs of the trees showing the light and shadow as they show the strongest contrast. During the shoot I experimented with having the light in front and behind me, both showing mixed results with some really good photos. I also tried different angles, such as straight on and looking up.
This is my favourite photo from the shoot. I really like how it stands out due to the vivid colours. The composition and angle is also good, with the subject filling the composition and the angle is low and on the same level as the leaves and grass. When editing, I enhanced the levels so that the shadow and light intensified to enhance the contrast. I also made the colours more vivid to make the image stand out more and add to the colour contrast.
 
  I took this photo to show the contrast between the nature and the man – made metal arch. I really liked how the fallen branch sort of wrapped its self around the arch, in a way linking the nature shown and the arch. I like how you cannot see part of the arch and river as it goes out of the composition. When editing I kept it quite simple, other than adjusting the levels and curves – but still keeping it natural – and just made the greens more vivid,  but not so much the colour looked false.
I like this photo as it shows a natural and simple contrast of the shadow and light. My favourite thing about this is how natural and simple it looks, yet still effective. I also like the depth, with the trees continuing into the background. I also like how the trees sort of frame the shadows shown in the open area. During editing I kept this really simple, just deepening the shadow and brightening the light areas.
 
 
What I am going to do next;
This was not a planned shoot, more of a last minute one due to the good weather allowing me to go out and shoot. If the weather is good again and I don’t have a shoot planned I may go out and do another one similar.


Work Record March 1st 2013

Preparation;

For this shoot I am going to show the idea of “life” to contrast my previous “death” shoot. To do this, I am going to use myself as a model and keep it really natural and normal with no face paint. This is to show the idea of “life”. I also plan on using the ring flash.


I like the image on the top due to the use of the camera. I like this because it relates to the idea of life, as camera capture memories and are related to the idea of life. I like the image on the bottom due to the relaxed, natural and happy pose the model is pulling. Although I like these images, I plan on keeping my photos in colour to show the idea of life more boldly.
To prepare I need to;
·   Book the studio
·   Plan any poses
·  Chose what background
·  Set up the ring flash
What I hope to achieve;
During this shoot I hope to achieve a shoot clearly showing the idea of life through the use of natural poses, and make up to clearly contrast my previous shoot showing the idea death.
What I actually achieved;
During this shoot I achieved what I wanted to, which was to show the ideas of life in a positive way. I achieved this by using the ring flash and a red background. I chose to use the ring flash due to the bright, professional look it gives photographs which helps show off the idea of life. I chose to use a red background as it is bright and therefore gives the photos a positive feel. During the shoot I decided to use a few props. I used a camera, which I got inspiration for from the image I mentioned, and I used a photo frame. I decided to use a variety of natural and fun/silly poses to show the idea of life as it shows it is a positive, happy way compared to dark and eccentric way I showed death previously.

This is my favourite photo from the shoot. I like it due to the use of the camera, which makes it seem natural and realistic. I like the composition as well, with me just to the left and not dead centre. I also like the very small shadow to the left as it adds some depth. When editing I experimented with the curves and made it look slightly unrealistic, vivid and bright.
 
I like this one due to the silly pose I am pulling. This makes it seem fun and relaxed – which are the positive emotions associated with life. When editing this I decided to make it black and white with selective colour on the lips as they are bright red and having then with colour and the rest black and white helps make the photo stand out. When editing I also used the dodge tool on the eyes. 
As the rest of the photos show quite false and silly poses, I decided to edit this one as it is natural and simple. I like how my head is turned to one side slightly, and how it is a natural, happy pose. This shows life well as it shows ideas of happiness. When editing, I kept it natural and realistic, only making my eyes bluer to stand out and using soft focus to soften the image.
What I am going to do next;
I am really happy with how this has turned out, and happy with how the contrast between this shoot and the previous one showing death is shown. I am not going to re shoot any of these shoots as they turned out well. I am however going to experiment with editing the images to merge the two shoots.


Friday 15 March 2013

Edits from Fire and Ice Shoot, March 12th 2013


Target March 15th 2013


By the end of this lesson you will have demonstrated a clear understanding of the potential and possibilities of your chosen topic by undertaking practical work that adds to the shoots in your practical folder.

My target today is to edit my photos from my last shoot - March 12th - of the contrasting ideas of fire and ice using makeup and a model. During editing I want to work on enhancing the contrast of the images. I also want to experiment with different techniques. I also want to plan out a few shoots. 

Edits from Shoot, March 5th 2013


Friday 1 March 2013

Life Edits March 1st 2013


February 26th 2013 Age Contrast Shoot

Preparation;
My aim for this shoot is to show the contrast between age. To do this I am going to use a baby/toddler and an older model to show a clear and strong contrast. I want to keep this shoot natural and realistic so I am not going to over edit the images in photoshop.


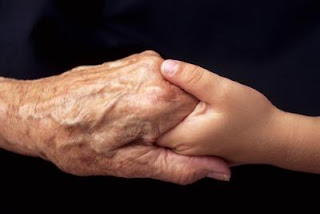
These images show possible ideas that I want to show in my shoot. I really like the photograph showing the hands as it clearly shows age contrast, and it also shows unity of the different generations. I really like the second image as I like how natural the pose is, as if the photo was taken without the woman noticing. These are both ideas I am going to take into consideration during my shoot. 

To prepare I need to;

  • Book the studio
  • Get my models 
  • Think about achievable poses and expressions I want to capture. 
What I hope to achieve; 
A simple yet effective and natural studio shoot showing the strong contrast between old and young age. 

What I actually Achieved; 
I am really happy with how the shoot went, and I mostly got some really good and natural photos which was my aim. I did find it harder shooting with a baby as it is hard to get the poses. But this also worked to an advantage as it made it easier to get more natural photographs. One of the ideas I wanted to show -  the hands did not work out. But the rest of my ideas worked out well and I am really happy with my results. I used a white background to show off the models more and too keep it simple. For the most of my shoot I used two lights to show keep it bright and keeping it happy. I did use just one light for a few photographs to show better form. Overall I am really happy with how this shoot turned out. 

I am really happy with how this turned out as it shows the natural pose I was aiming for. I also really like how the baby is looking towards the camera as well. When editing this I decided to make it Duotone to add some more drama to the image. I also used soft focus to make it softer and not as harsh, the fact that it is quite bright as well makes it feel lighter as well. I also used the dodge tool on the babies eyes to make them pop out more and stand out. 


I like this image as it is facing the model rather than look down on her. I also like how the model is exactly central in the composition. When editing I used soft focus and the dodge tool on the eyes. I done this to keep it natural and bright. I think soft focus works really well on enhancing the innocent look of the baby. 


I like this image due to how relaxed and casual the models pose it. I also like how she is central in the composition. I kept the colour slightly yellow as it makes it seem warmer and more more relaxed. When editing this image I just changed the levels and curves as I do not think this needed over editing and I wanted to keep it realistic and natural. 


What I am going to do next;
In terms of shooting I am really happy with how this turned out so I am finished with this shoot. With editing however, I am going to do some more, experimenting with transferring the older models facial features onto the baby to show a vivid and surreal contrast.